Upload & remediate
Send documents into the remediation pipeline and choose how they're processed.
Pick your files, pick a strategy, run it. The strategy you choose decides which settings you're offered next — and it's the one setting that matters, because everything else has a working default.
Start the run
From the Document Accessibility Hub, choose Start Upload.
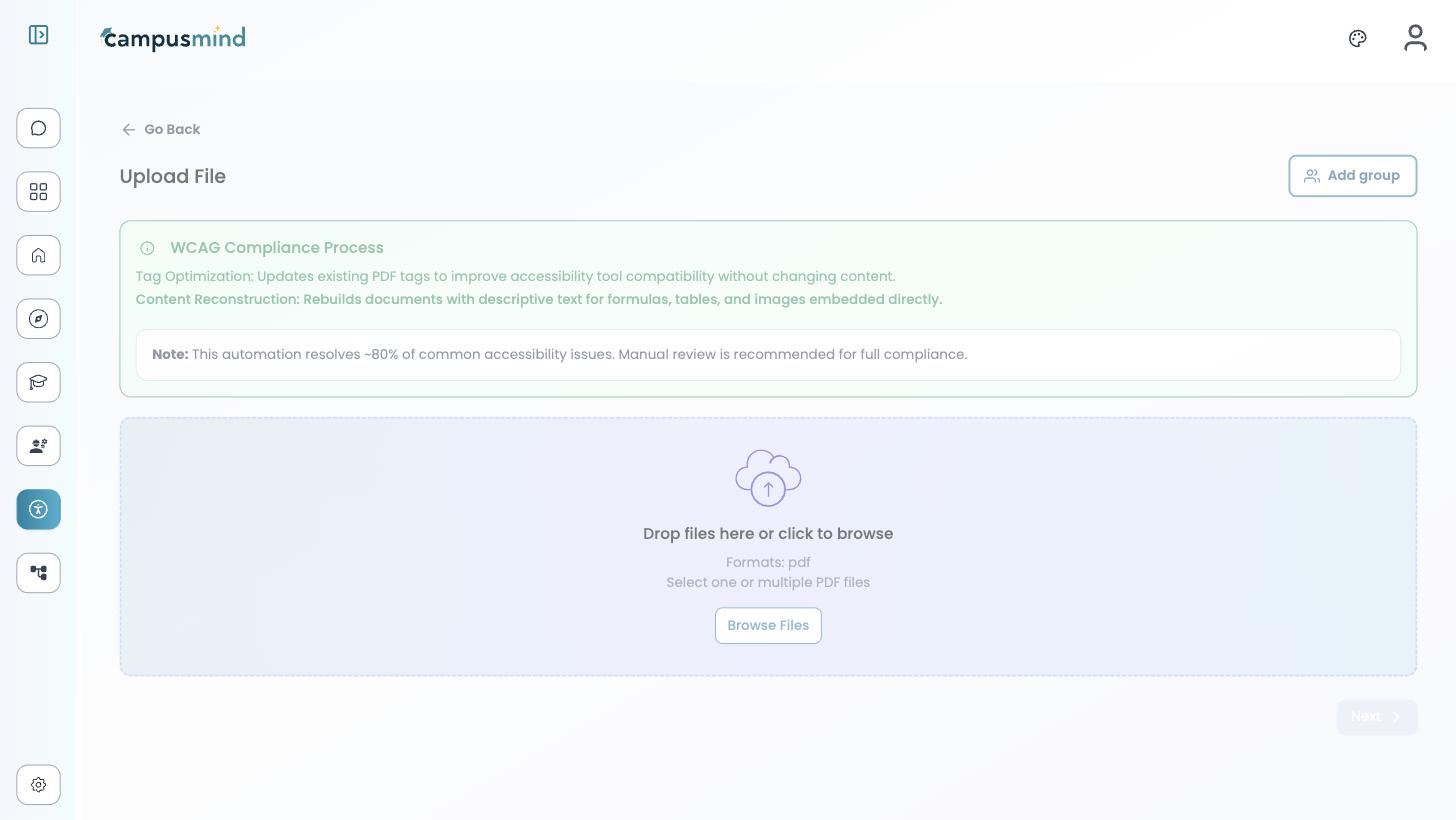
Drop the files on the panel or choose Browse Files. Give the batch a name you'll recognize later — otherwise it keeps a system-generated label. Add group shares the resulting batch with one or more groups so colleagues can work on the output — leave it alone if the batch is just for you. Choose Next.
For documents that live in an LMS, start from Make Course Accessible instead — see Connect a source. Both paths meet at the same configuration screen.
Choose a strategy
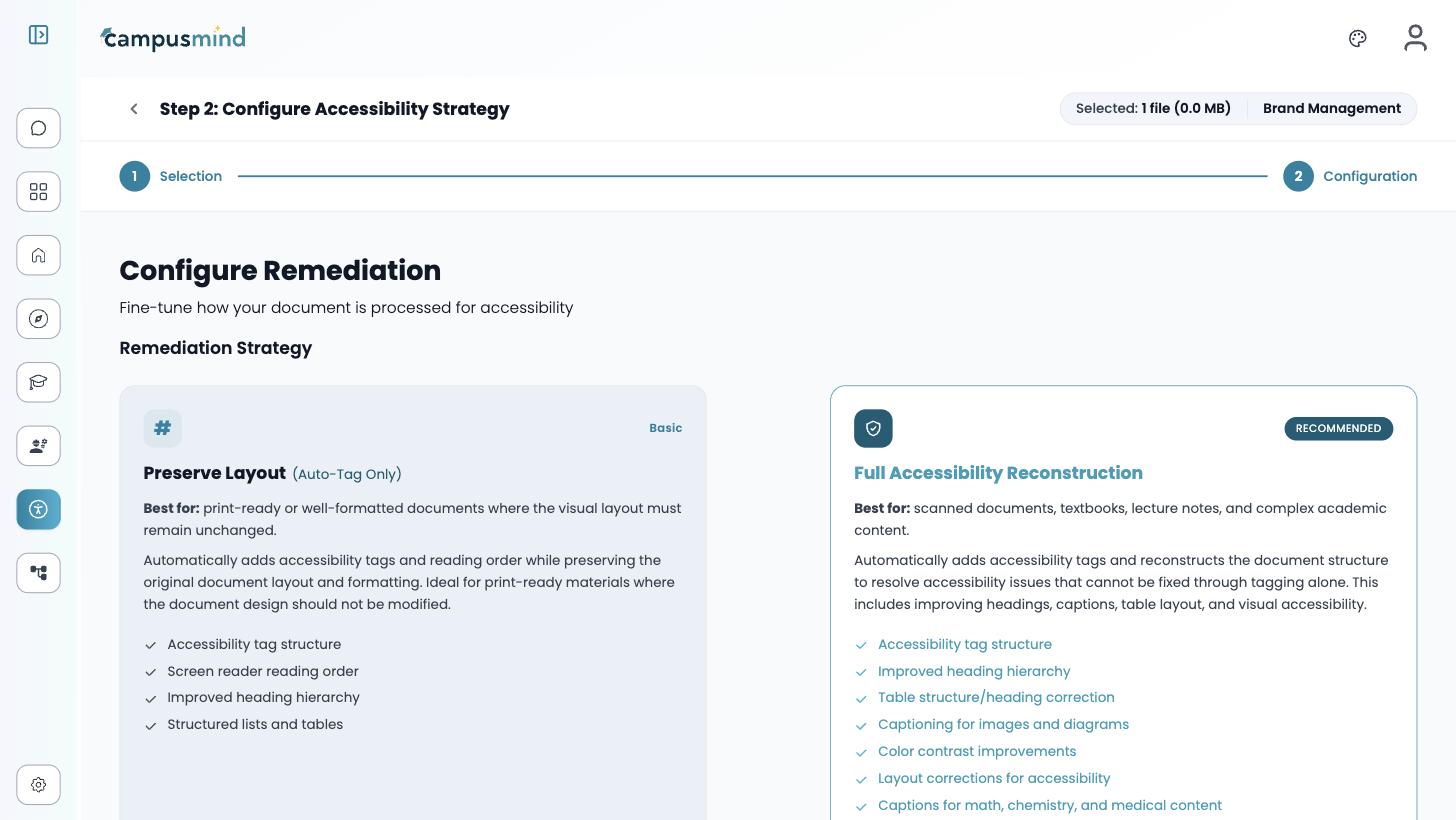
| Preserve Layout (Auto-Tag Only) | Full Accessibility Reconstruction | |
|---|---|---|
| Best for | Print-ready or well-formatted documents whose layout must not change | Scanned documents, textbooks, lecture notes, complex academic content |
| You get | Tag structure, screen reader reading order, improved heading hierarchy, structured lists and tables | All of that, plus table structure and heading correction, captioning for images and diagrams, color contrast improvements, layout corrections, and captions for math, chemistry and medical content |
| Changes the page? | No | Yes — including page count, as content reflows |
Elsewhere in the product, Full Accessibility Reconstruction appears as Full Remediation or Full Reconstruction — on the hub's Strategy filter and the analytics pipeline breakdown. Same thing.
Advanced Settings
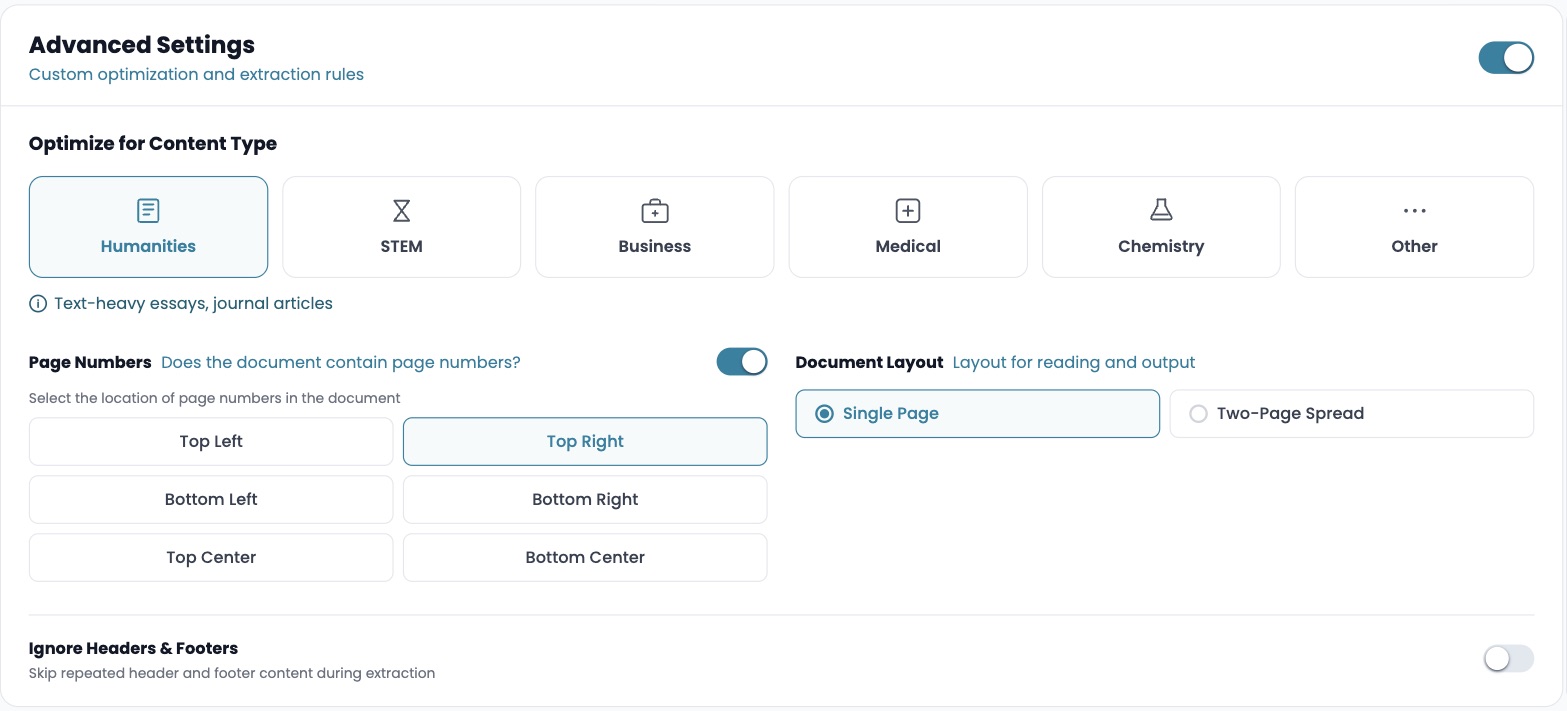
Labeled Custom optimization and extraction rules, this block sits directly below the strategy cards and is offered only with Full Accessibility Reconstruction, on by default. Turning it off collapses the four settings below — the extraction engine and thresholds further down the page stay either way.
| Setting | Default | What it does |
|---|---|---|
| Optimize for Content Type | Humanities | Tells the pipeline what kind of document it's reading, so it knows what to expect on the page |
| Page Numbers | On, Top Right | Turn it off for a document with no page numbers. On, a grid appears for the position: Top / Bottom × Left, Center, Right |
| Document Layout | Single Page | Choose Two-Page Spread when a scan captures two facing pages in one PDF page |
| Ignore Headers & Footers | Off | Skips repeated header and footer content, so a running header isn't tagged on every page |
Content types
Match the content type to what the document actually is — the reconstruction features that need subject knowledge key off this.
- Humanities (default) — text-heavy essays and journal articles
- STEM — math, formulas, technical diagrams
- Business — financial reports, tables, charts
- Medical — medical terminology and captions
- Chemistry — molecular structures and chemical formulas
- Other — general-purpose document content
Extraction engine and thresholds
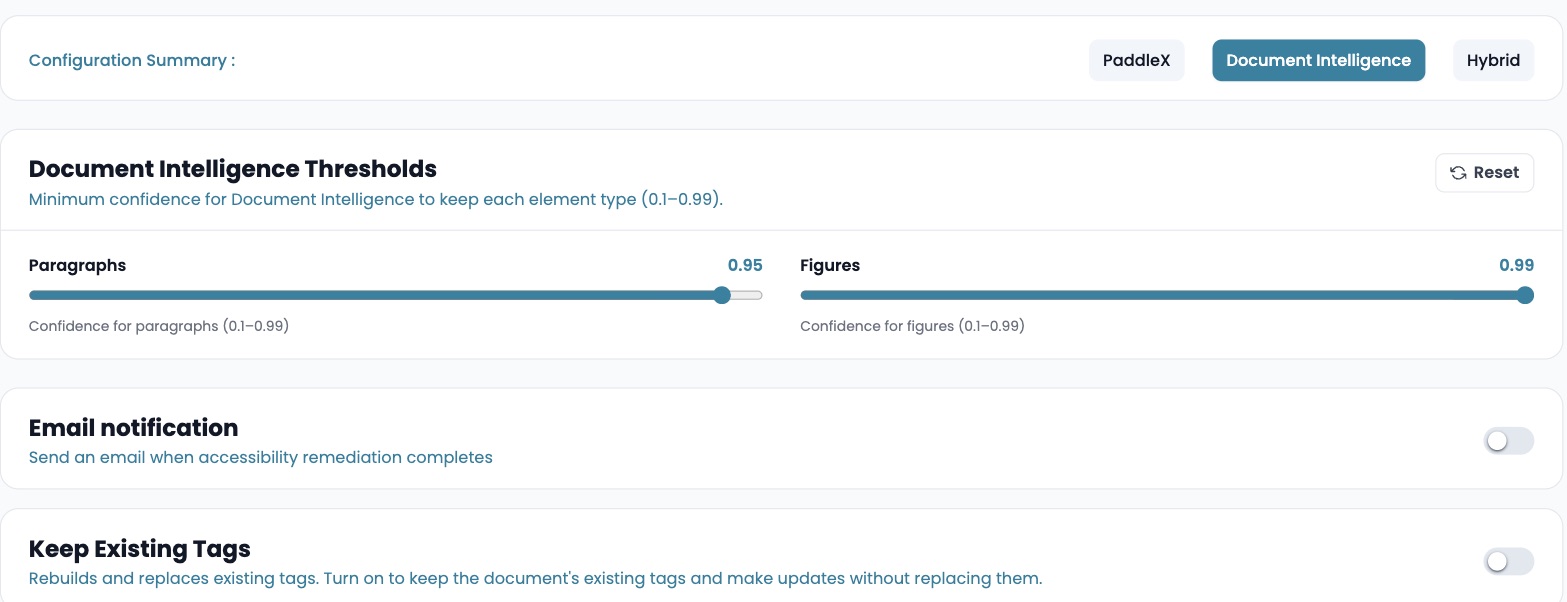
These sit under Configuration Summary on both strategies.
Choosing an engine
The right engine depends on what the document is made of, not on how good you want the result to be.
| The document is | Choose | Why |
|---|---|---|
| Scientific, mathematical or engineering material — heavy on equations, expressions and tables | PaddleX | It detects formulas as document elements in their own right. Reach for it when accurate formula detection matters more than fine-grained classification of headings and text structure |
| Descriptive and text-heavy | Document Intelligence (default) | Stronger semantic understanding: it's the better classifier of headings, lists, paragraphs and textual hierarchy. It has no dedicated formula detection |
| Both — technical reports, research papers, academic publications, mixed content | Hybrid | PaddleX handles formulas and tables; Document Intelligence handles headings, lists, paragraphs and semantic classification |
The threshold panels
A threshold is the minimum confidence an engine needs before it treats something as an element. Your engine decides which panel appears below it, and each panel has its own Reset.
| Engine | Threshold panel | Sliders and defaults |
|---|---|---|
| PaddleX | PaddleX Thresholds (0.1–1.0) | Table 0.50, Formula 0.50, and one for layout elements |
| Document Intelligence (default) | Document Intelligence Thresholds (0.1–0.99) | Paragraphs 0.95, Figures 0.99 |
| Hybrid | Both | Every slider from both panels |
Raising and lowering a threshold
Neither direction is safer than the other — you're choosing which kind of mistake you'd rather correct by hand afterwards.
| Move the slider | What you get | What it costs |
|---|---|---|
| Lower | Higher sensitivity. More potential elements are detected — useful when missing content is the bigger worry | False positives: content wrongly identified as a table, formula or layout element |
| Higher | Higher precision. The engine is more selective, so fewer things are picked up in error | False negatives: valid elements go undetected |
The PaddleX thresholds are PaddleX-only
They set the confidence PaddleX needs to detect tables, formulas and layout elements. They have no effect on Document Intelligence — including under Hybrid, where each engine follows its own panel.
See How CampusMind works for where thresholds sit in the pipeline.
Before you run
Two toggles finish the screen, both off by default:
- Email notification — emails you when remediation completes. Worth it on a large run: a batch is capped at 100 files, and a course that size won't finish while you wait.
- Keep Existing Tags — updates the document's current tags instead of replacing them. Use it when a document was hand-tagged and you don't want that work discarded.
The footer shows a processing estimate. Choose Run Accessibility Remediation to start.
Track progress
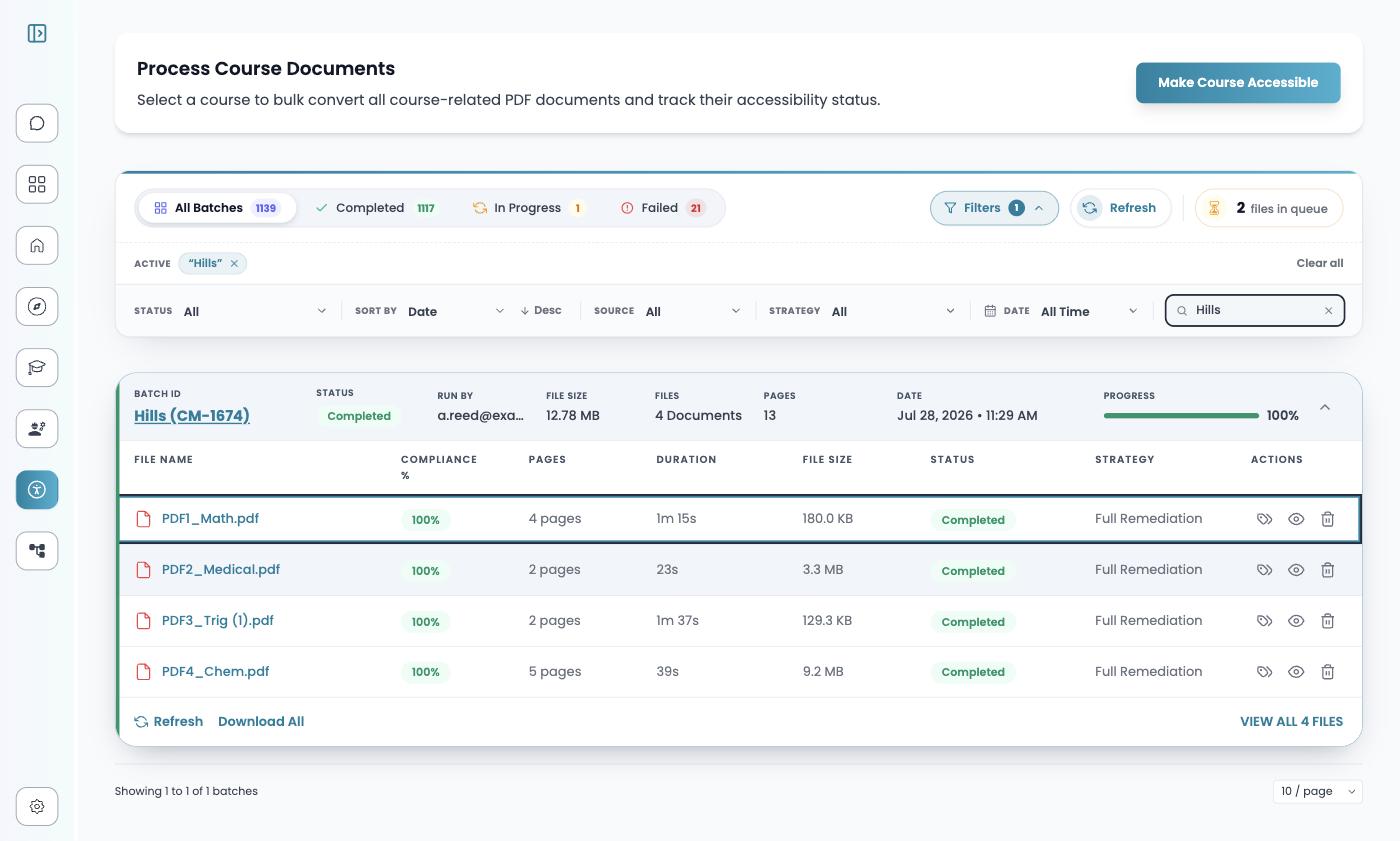
You return to the hub, where the new batch appears at the top with its ID, status, who ran it, total size, file and page counts, date, and a progress bar.
| Status | Meaning |
|---|---|
| Pending | Queued, not started |
| In Progress | Currently running |
| Completed | Every file finished successfully |
| Partially Completed | Some files finished, some failed |
| Failed | The batch did not produce output |
Expand a batch with the chevron on the right for each file's compliance score, pages, duration, size, status, and the strategy that ran. Refresh updates statuses without reloading the page.
The toolbar counter shows how many files are queued across the whole tenant. To find an older batch, open Filters and narrow by status, source, strategy or date, or search by name.
When a file fails
Failures are reported per file, not just per batch, with the reason shown inline. On a course run the usual cause is an expired or invalid LMS access token — reconnect the source and run the unrun files again. See Troubleshooting.
Next steps
- Tag & caption editor — correct the output, then revalidate and download it.
- How CampusMind works — what happens in between.