Read the remediation report
Open a document's remediation report, read its score and findings, and decide what to fix next.
Every remediated document gets a remediation report: the before-and-after record of what the pipeline found, what it fixed, and what still needs a person. It's the screen you check before downloading anything — and, downloaded as a PDF, the document you hand to anyone who asks what remediation changed.
Open the report
The report lives on the document details page, one tab over from the comparison view.
On the Document Accessibility Hub, expand a completed batch with the chevron on the right.
Choose the eye icon (View file details) on the file you want.
Select the Remediation Report tab, next to Comparison View.
Read the score panels
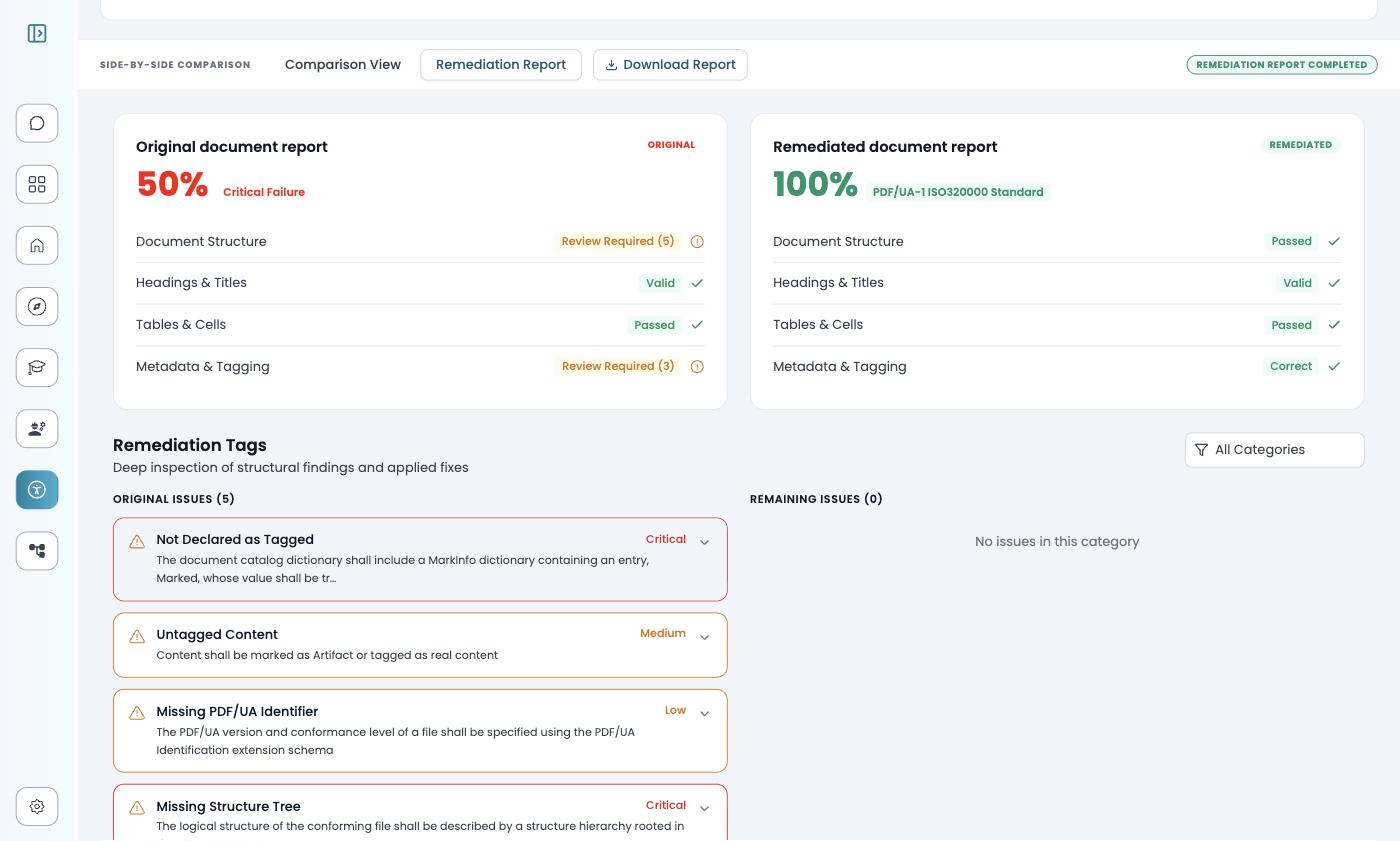
Two panels sit side by side: the Original document report and the Remediated document report. Each shows the file's score — the share of the 106 PDF/UA-1 rules that pass — so you can see exactly how far remediation moved the document.
The four categories
Each panel breaks the score down across four categories, with a status per row — a clean verdict such as Passed, Valid, or Correct, or Review Required with a count of findings.
| Category | What it covers |
|---|---|
| Document Structure | The tag tree and reading order that hold the document together |
| Headings & Titles | Heading levels and the document title |
| Tables & Cells | Table structure, header cells, and how cells announce |
| Metadata & Tagging | Document metadata and the tagging markers PDF/UA-1 requires |
Original and remaining issues
Below the panels, Remediation Tags lists the findings themselves in two columns: Original Issues on the left, Remaining Issues on the right. Each issue card names the rule behind it — Missing Structure Tree, Untagged Content — carries a severity (Critical, Medium, or Low), and expands for the full rule description.
- Original Issues is what the file came in with. Resolved findings stay visible here, so the report keeps the "before" even when the "after" is clean.
- Remaining Issues is your to-do list. When it's empty, the column says so; an All Categories filter narrows both lists to one category.
A document can score highly and still have findings — passing a rule set is not the same as being usable, so read this section even when the score ring is green.
Download the report as a PDF
Choose Download Report, beside the tabs. The button appears only for files that completed
successfully, and saves a structured PDF named {filename}_accessibility_report.pdf — the
version meant to be shared.
- Document metadata — title, file name, language, pages, size, and creation and modification times.
- A grade from A to F, with Pass / Warning / Error totals.
- A category breakdown across Basic Requirements, Metadata and Settings, and Logical Structure.
The downloaded PDF groups findings differently from the on-screen tab — same document, a breakdown laid out for a reader who never opens CampusMind.
What to do next
Anything under Remaining Issues is work for the Tag & Caption Editor.
Choose Edit Tags on the document details page and correct what the report flags — retag an element, rewrite alt text.
Save your edits. Saving stacks a new version on top of the remediated one rather than replacing it.
Choose Revalidate to re-run the PDF/UA-1 check, then reopen the report to confirm the findings cleared.
Download the corrected PDF, and Download Report again if you need the updated record.
The report answers "show me what changed for this document". For numbers across the whole institution, use Export CSV on the analytics dashboard — see Version history for what the product records and what it doesn't.
Related
- Quickstart — the full loop, upload to download.
- How CampusMind works — where the score comes from.
- Tag & caption editor — the fixes themselves.